Introduction
ADO.NET is the interface of choice when developing database applications with .NET. Using the ADO.NET interface is performance efficient since ADO.NET provides the most direct method of data access in .NET. The ADO.NET interface allows you to develop applications in the language best suited for the task. Whether you chose to use Visual Basic.NET, C#, J#, C++, or any other .NET compatible programming language, your application will use the same ADO.NET library and the database logic will look the same.
The Mimer SQL Data Provider is used to connect to Mimer SQL from .NET, in order to execute queries, fetching results, and so on. The Mimer SQL Data Provider is available for .NET 6.0 and later as well as .NET Framework 4.6.2 and later.
The provider for .NET Framework is very well integrated in Microsoft Visual Studio. For example, you can do the following:
- Utilize the full IntelliSense support
- Drag objects like MimerCommand and MimerConnection directly onto your different forms
- Work with the Server Explorer
- Read the documentation along with Microsoft’s standard documentation (including support for dynamic help)
- Use the concept of side-by-side execution allowing that several versions can be installed in parallel on a single computer
For a complete documentation, please see the Mimer SQL Data Provider Manual.
Installation
Windows
For Windows, we recommend using the Windows installation package for the Mimer SQL Data Provider. Download the latest release from the Download page.
Start the Mimer SQL Data Provider installation. It will install the Mimer SQL Data Provider in the folder you specify, install the required assemblies in the Global Assembly Cache, and integrate the Mimer SQL Data Provider with Visual Studio (if available).
There is also a NuGet package with the run-time library available. When running the Mimer SQL Data Provider installation, the NuGet package is placed in the installation folder, and the path to it is added to the NuGet package manager configuration files on your machine as a package source for ease of access. You can then install the package via NuGet Package Manager for the project where you want to access your Mimer SQL database.
The NuGet package is also available for download on NuGet.org. If only the NuGet package is installed in your project and the Mimer SQL Data Provider installation is not run, the Global Assembly Cache will be untouched and there will be no integration with Visual Studio, but there is full support for the run-time API of the Mimer SQL Data Provider for a project written in .NET 6.0 or later, or .NET Framework 4.6.2 or later.
Linux / macOS
There is a NuGet package with the run-time library available on NuGet.org. It has full support for the run-time API of the Mimer SQL Data Provider for a project written in .NET 6.0 or later.
The NuGet package can be installed through the NuGet Package Manager or by using the following command:
dotnet add package MimerSQL.Data.Provider
Mimer SQL Data Provider Basics
The Mimer SQL Data Provider consists of the namespace Mimer.Data.Client which contains all the required classes for accessing a Mimer SQL database server. In this C# example, we will use these classes to connect to a Mimer SQL server, insert data into a table, and then select data from a table. The full sample code can be found here.
After installing the Mimer SQL Data Provider, we can add a namespace declaration to Mimer.Data.Client.
using Mimer.Data.Client;
This gives us access to the classes MimerConnectionStringBuilder, used to construct connection strings, and MimerConnection, used to connect to a database server. First, we will use the MimerConnectionStringBuilder to specify which database to connect to, protocol, and login credentials. Next, a MimerConnection object is created using the connection string. The MimerConnection can then be opened by calling the Open-method.
var connectionString = new MimerConnectionStringBuilder();
connectionString.Database = "myDatabase";
connectionString.Protocol = "local";
connectionString.UserId = "sysadm";
connectionString.Password = "admpwd";

Console.WriteLine("Connecting to database with connection string: ");
Console.WriteLine(" \"" + connectionString.ToString() + "\"");

using (MimerConnection conn = new MimerConnection(connectionString.ToString())) {
    conn.Open();
}
Note that conn.Close() will be automatically called after the using-scope is exited.
When the connection to the database is open we can use the class MimerCommand to execute SQL statements. In the following code snippet, a new MimerCommand is created to insert data into a table called Persons. MimerParameter is then used to securely add parameters to the SQL query. Finally, ExecuteNonQuery is called to execute the statement. ExecuteNonQuery is used for SQL statements that do not return a result, such as INSERT, UPDATE, and DELETE.
MimerCommand insertCommand = new MimerCommand("insert into Persons (personID, FirstName) values(?, ?)", conn);
// Add parameters for the two columns
MimerParameter par1 = new MimerParameter();
MimerParameter par2 = new MimerParameter();
insertCommand.Parameters.Add(par1);
insertCommand.Parameters.Add(par2);
par1.Value = 1;
par2.Value = "Eve";
insertCommand.ExecuteNonQuery();
To select data from a table in the Mimer SQL database, a new MimerCommand is created. Since a SELECT statement returns a result set we use the method ExecuteReader on the MimerCommand object, which returns a MimerDataReader. The MimerDataReader object is used to read a stream of data rows from the database server.
MimerCommand selectCommand = new MimerCommand("select * from Persons", conn);
// Create a data reader to retrieve the rows from the database
MimerDataReader reader = selectCommand.ExecuteReader();
while (reader.Read()) {
    //  Display content of row in console
    Console.WriteLine("Id: {0} Name: {1}", reader.GetInt32(0), reader.GetString(1));
}
reader.Close();
Transactions
So far, we haven’t used explicit transaction handling and therefore auto-commit has been enabled. This means that all commands have been executed in their own transaction. The Mimer SQL Data Provider also supports transaction handling using the class MimerTransaction. A transaction is started by calling the MimerConnection.BeginTransaction(IsolationLevel) that returns an instance of MimerTransaction. The different isolation levels are available in System.Data.IsolationLevel. For example, System.Data.IsolationLevel.ReadCommitted can be used.
Whenever a transaction has been started on a connection all statements using this connection automatically take part in the transaction. When we are done with the work, we simply call MimerTransaction.Commit() or MimerTransaction.Rollback() to commit or roll back the transaction.
MimerTransaction mimerTransaction = conn.BeginTransaction(System.Data.IsolationLevel.ReadCommitted);
try {
    // First approach
    MimerCommand command1 = new MimerCommand("insert into Persons (personID, FirstName) values (2, 'John')", conn);
    MimerCommand command2 = new MimerCommand("insert into Persons (personID, FirstName) values (3, 'Jane')", conn);

    // Execute and commit
    command1.ExecuteNonQuery();
    command2.ExecuteNonQuery();
    mimerTransaction.Commit();
}
catch (MimerException mimEx) {
    // Show Errors
    try {
        mimerTransaction.Rollback();
    }
    catch (MimerException mimEx2) {
        // Show Errors
    }
}
As you can see, we simply commit when we are done and if a MimerException is thrown we do a roll back. Note that the trans.Rollback() method can throw a MimerException itself and is therefore surrounded by its own try-catch.
Data Browser Example
As another example of how to work with the Mimer SQL Data Provider, we will develop a data browser as a Windows desktop application. The application will be written in C# and use the UI framework WPF (Windows Presentation Foundation) with .NET Framework 4.7.2. The full sample code can be found here.
In the data browser application, the user can select among all available databases and their corresponding tables in two combo boxes. When the Load button is pressed, after selecting a database and a table, a DataTable will be created and shown in an updatable DataGrid. If the rows are updated and the Save button is pressed, the changes are sent to the database.
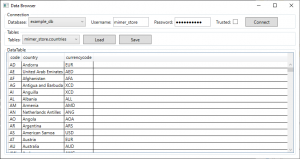 Figure 1 – The data browser application showing the contents of a table in the Mimer SQL Example Environment.
The architecture of ADO.NET allows you to work in either a connected or a disconnected environment. The disconnected mode uses a MimerDataAdapter which handles the connecting and disconnecting to the database automatically. This is the way most of the work in this example application will be carried out. However, we will also work in a connected mode using MimerConnection, MimerCommand, and MimerDataReader to get the available tables in the selected database.
The application
When you are working with the Mimer SQL Data Provider you can use the MimerDataSourceEnumerator class to get a list of available databases. This manner is used to populate the combo box with available databases.
DataTable dataTable = MimerDataSourceEnumerator.Instance.GetDataSources();
cmbDatabases.ItemsSource = dataTable.AsDataView();
The combo box element is defined using the following XAML markup.
<ComboBox Name="cmbDatabases" MinWidth="160" Margin="0,0,10,0">
    <ComboBox.ItemTemplate>
        <DataTemplate>
            <TextBlock Text="{Binding Database}"/>
        </DataTemplate>
    </ComboBox.ItemTemplate>
</ComboBox>
The user can select a database and supply login credentials either by entering a username and a password or by checking the Trusted-checkbox which will use the current Windows user to login. When the user clicks the Connect-button the event handler btnConnectClick will be executed, which will call the methods UpdateConnection, which updates the connection string, and UpdateTableComboBox, which will populate the second combo box with table names. The second combo box element is defined using the following XAML markup.
<ComboBox Name="cmbTables" MinWidth="160"></ComboBox>
The method btnConnectClick is seen below.
private void btnConnectClick(object sender, RoutedEventArgs e)
{
    // Collect input from combobox, textboxes, and checkbox
    DataRowView drv = (DataRowView)cmbDatabases.SelectedItem;
    string dbname = (drv != null) ? drv["Database"].ToString() : "";
    string username = txtUsername.Text;
    string password = txtPassword.Password;
    bool useIntegratedSecurity = (bool)chkTrusted.IsChecked;

    UpdateConnection(dbname, useIntegratedSecurity, username, password);
    UpdateTableComboBox();
}
The method UpdateConnection uses the MimerConnectionStringBuilder to construct the connection string and then updates the ConnectionString property of the MimerConnection object.
private void UpdateConnection(string dbname, bool useIntegratedSecurity, string username, string password) {
    // Close previous connection, if there is one open
    mimerConnection.Close();

    // Build connection string
    var connectionString = new MimerConnectionStringBuilder();
    connectionString.Database = dbname;
    connectionString.IntegratedSecurity = useIntegratedSecurity;
    connectionString.Protocol = "local";
    if (!useIntegratedSecurity) {
        connectionString.UserId = username;
        connectionString.Password = password;
    }
    // Update connection string
    mimerConnection.ConnectionString = connectionString.ToString();
}
The method UpdateTableComboBox will open a connection and query the database and fetch the result, which is used to update the combo box with table names.
private void UpdateTableComboBox()
{
    try {
        mimerConnection.Open();

        // Populate combobox with tables
        cmbTables.Items.Clear();
        MimerCommand selectTablesComm = new MimerCommand("select table_schema, table_name from information_schema.tables where table_type='BASE TABLE'", mimerConnection);
        MimerDataReader reader = selectTablesComm.ExecuteReader();
        while (reader.Read()) {
            cmbTables.Items.Add(reader.GetString(0) + "." + reader.GetString(1));
        }
    } catch (Exception ex) {
        errorHandler.ShowException(ex);
    } finally {
        mimerConnection.Close();
    }
}
The class called errorHandler is used to handle possible exceptions. This class will be described in more detail below.
To update the datagrid element, which is defined with the following XAML markup
<DataGrid Name="dgTable" ItemsSource="{Binding}"></DataGrid>
the user has to press the Load button, which will call a method named LoadDataTable. The table name is used to construct a SELECT command by a MimerDataAdapter. When executed, a DataTable is created that we will bind to our DataGrid. This is all that is needed to show the content of any table in a Mimer SQL database.
private void LoadDataTable(string tableName)
{
    try {
        StringBuilder selCmd = new StringBuilder();
        selCmd.Append("select * from ");
        selCmd.Append(tableName);
        mimerDataAdapter = new MimerDataAdapter(selCmd.ToString(), mimerConnection);
        dt = new DataTable();
        mimerDataAdapter.Fill(dt);
        dgTable.DataContext = dt.DefaultView;
    }
    catch (Exception ex) {
        errorHandler.ShowException(ex);
    }
}
The method that handles the updates is equally simple. It is called when the user has edited some columns and pressed the Save-button. A new DataTable that contains all the changed rows is created. If the new DataTable contains any rows, a MimerCommandBuilder is attached to the MimerDataAdapter and the Update method is called on the MimerDataAdapter.
private void UpdateDataTable()
{
    try {
        DataTable dtChanges = dt.GetChanges();
        if (dtChanges != null) {
            MimerCommandBuilder mBuild = new MimerCommandBuilder(mimerDataAdapter);
            mimerDataAdapter.Update(dtChanges);
            dt.AcceptChanges();
        }
    }
    catch (Exception ex) {
        errorHandler.ShowException(ex);
    }
}
Exceptions and Errors
In this example, we are using a class called ErrorHandler to take care of exceptions. The Mimer SQL Data Provider can throw different types of system exceptions, such as ArgumentException or InvalidOperationException. The data provider can also throw a MimerException, which is unique for the Mimer SQL Data Provider. When working with Mimer SQL Data Provider you can catch MimerException and use the MimerError class to get more information.
The following method will extract information from the exception and display it in a message box in the data browser application.
public void ShowException(Exception ex)
{
    string message = ex.Message;
    StringBuilder messageBuilder = new StringBuilder(message);
    Exception innerException = ex.InnerException;
    while (innerException != null) {
        if (!message.Equals(innerException.Message)) {
            messageBuilder.Append("\r\n");
            messageBuilder.Append(innerException.Message);
        }
        innerException = innerException.InnerException;
    }
    //If the Exception is a MimerException use helper method ExtractErrors
    if (ex is MimerException) {
        foreach (MimerError mErr in ((MimerException)ex).Errors) {
            ExtractErrors(mErr, messageBuilder);
        }
    }
    MessageBox.Show(messageBuilder.ToString(), "An exception was thrown", MessageBoxButton.OK, MessageBoxImage.Error);
}
The ExtractErrors method is a helper method used to extract information from a MimerError. A MimerError holds information about an error returned by the database server.
 private void ExtractErrors(MimerError mErr, StringBuilder msg)
{
    if (mErr.Message.Length > 0) {
        msg.Append("\r\nError message: ");
        msg.Append(mErr.Message);
    }
    if (mErr.SQLState != null && mErr.SQLState.Length > 0) {
        msg.Append("\r\nSQLState: ");
        msg.Append(mErr.SQLState);
    }
    if (mErr.NativeError != 0) {
        msg.Append("\r\nNative error: ");
        msg.Append(mErr.NativeError);
    }
    if (mErr.Source.Length > 0) {
        msg.Append("\r\nSource: ");
        msg.Append(mErr.Source);
    }
}
Summary
As we have shown in this article, ADO.NET programming can be really simple and yet powerful. With the Mimer SQL Data Provider, you can work in both connected and disconnected modes to suit the needs of your application.
Links
The Mimer SQL Data Provider is available for download under the Mimer Data Provider on the Download page. The NuGet package is available on NuGet.org.
The complete code presented in the section Mimer SQL Data Provider Basics can be found in MimerSQLDataProviderExample.cs.
The complete data browser example can be found in the DataBrowser.zip archive.
For further details, refer to the Mimer SQL Data Provider Manual available at the Documentation site.