Mimer Trust is an essential tool for developers looking to enhance the security of their data storage while retaining the advantages offered by a Database Management System (DBMS). It can be seamlessly integrated into applications, whether they are executed within a secure Trusted Execution Environment (TEE) or externally, allowing for simultaneous usage from both types of applications. This feature simplifies the sharing of data between these two application types.
In this article, we provide an overview of Mimer Trust as well as examples of its practical applications. For a more comprehensive understanding of Mimer Trust, please refer to the documentation set included in the download package.
Introduction
Mimer Trust is a software package designed to combine the benefits of using a SQL based Relational Database Management System (RDBMS) combined with the secure data storage in a Trusted Execution Environment (TEE). A TEE is an isolated environment that provides a secure execution space for sensitive applications and data. TEEs are designed to ensure the confidentiality and integrity of code and data even in the presence of a compromised operating system or other security threats, and are therefore the natural choice when dealing with sensitive data. A system with an integrated TEE is normally divided into the “normal world” and the secure world, which refers to the environments outside and inside the TEE, respectively. Applications executed in the normal world are referred to as normal world applications, and applications executed in the secure world as Trusted Applications (TAs). Normal world applications which communicate directly with a TA can be further classified as Client Applications (CAs). Mimer Trust is useful for both normal world application developers and TA developers, providing interfaces to both types of applications.
Mimer Trust allows developers to:
- Seamlessly access sensitive data in the TEE’s secure storage through normal database operations
- Take advantage of Mimer SQL’s security mechanisms as a layer on top of the TEE’s secure storage
- Securely share data between TAs and normal world applications
- Speed up the development process by providing an out-of-the-box data handling TA
- Control data access policies with a high degree of granularity
- Take advantage of the power of the SQL language
Mimer Trust is developed in cooperation with Trustonic, a global leader in device-locking technology. It is based on Trustonic’s TEE implementation Kinibi and TableStore library. Developers wishing to take advantage of Mimer Trust to secure their applications must therefore first make sure to have Kinibi integrated into their development environment. The full set of prerequisites are listed in the following section.
The Mimer Trust package is available for both Android and Linux. The recommended way to get started is to obtain a Linux image for QEMU with Kinibi already integrated from Trustonic. Follow the provided guides to integrate the Trustonic SDK and TableStore library into the environment. Once it is possible to build and run the provided application samples, move on to the Mimer Trust documentation set — included in the download package — to find the “Getting Started” guide relevant for the chosen development platform.
Requirements and Prerequisites
The following components are necessary to start using Mimer Trust:
- Kinibi TEE
- Trustonic SDK
- Trustonic’s TableStore library
- Mimer Trust download package for the chosen platform
For version information and platform dependent requirements, see the Mimer Trust documentation relevant to your development platform – usually provided within the distribution package.
Software Components
Mimer Trust is a solution which consists of several different components, each fulfilling a different task for the joint purpose of securing your data. This section provides a brief description of each of the main components.
Mimer SQL
A fully fledged version of Mimer SQL, providing a high-performance database engine to normal world applications. The Mimer Trust extension to Mimer SQL defines views and procedures in order to let it act as an intermediary between normal world applications and the Mimer Server TA.
For information on how to use Mimer SQL, please see the Mimer SQL Documentation Set.
Mimer Server TA
This out-of-the-box TA handles all access to the secure data, and stores meta data about the secure database itself. It is the only component which is allowed to directly read or modify the secure database. It is possible to interact with this TA from the normal world via Mimer SQL and Mimer Trust Admin, or from another TA in the secure world via the Mimer Trust API.
Mimer Trust Admin
The Mimer Trust Admin is a normal world tool which is used to set up the TEE database and prepare the Mimer SQL database for interaction with the Mimer Server TA.
It can be used to create or drop tables in the secure database in the TEE, and create the mappings needed for accessing the secure data from the normal world. Mappings are a collection of views and procedures stored in the Mimer SQL database which handle the communication with the Mimer Server TA. When creating tables via Mimer Trust Admin, all necessary mappings for the tables are created automatically. It allows you to specify which schema the mappings should be created in, and you can create or remove mappings for specific tables. It is possible to create tables from a TA – via the Mimer Trust API – and later make these available to Mimer SQL by using Mimer Trust Admin to create the corresponding mappings.
Mimer Trust API
The Mimer Trust API allows TA developers to easily store and access sensitive data from their TAs, as well as securely share this data with the normal world through Mimer SQL when required. It provides functions for creating and dropping tables, as well as functions for normal database operations such as `SELECT`, `INSERT`, `UPDATE` and `DELETE` using a SQL-like syntax, including support for the conditional `WHERE` clause. The Mimer Trust API supports a large subset of the data types available in Mimer SQL. It also supports transactional operations, which keep your data consistent.
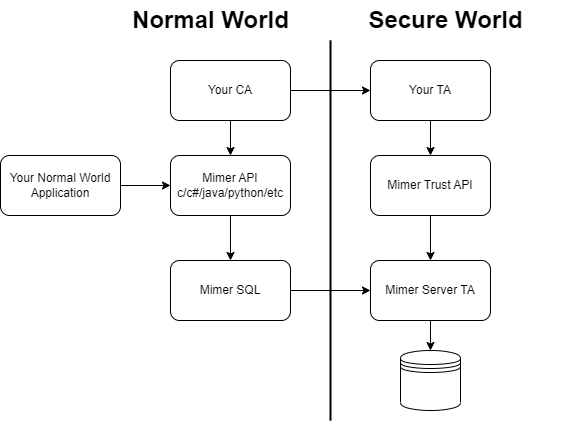
Architectural Overview
The diagram below shows how your applications can interact with the different components of Mimer Trust. Your own TAs can interact with the Mimer Server TA through the Mimer Trust API, whilst your normal world applications can use one of the available Mimer SQL APIs to interact with the running Mimer SQL server, which in turn handles communication to the Mimer Server TA.
Note that a normal world application which interacts with a Trusted Application (TA) directly is normally called a Client Application (CA).
See the following flow chart covering the architectural overview of the Mimer Trust components:
Using Mimer Trust
In this section, we’ll have a look at some examples of secure database setup and usage which you should be able to try for yourself once the installation of Mimer Trust is complete. Whilst accesses to the secure database from within the secure world is made via the Mimer Trust API, developers who wish to access the data from the normal world must interact with Mimer SQL. To do so from a normal world application, Mimer provides several APIs such as the Mimer SQL C API (or just MimerAPI). To interactively access Mimer SQL, one can use the command line tool BSQL, or the GUI-based application DbVisualizer.
Creating Your Database
The secure database is created upon first access. To create tables in the database, you can write table definition files which are used by Mimer Trust Admin to both create and drop tables. You may also create your tables via the Mimer Trust API, but remember that in order to use such tables from the normal world the corresponding mappings must be created via Mimer Trust Admin. The following subsections showcase both ways of defining and creating tables.
Via Mimer Trust Admin
To create tables via Mimer Trust Admin, the first step is to create one or more table definition files in YAML format.
Let’s take a look at the example file, `sensor.yaml`:
- table: TEMPERATURE
schema: SENSOR
mimer-select: 1
mimer-insert: 0
mimer-update: 0
mimer-delete: 0
tee-select: 1
tee-insert: 1
tee-update: 1
tee-delete: 1
index-column: SENSOR_ID
columns:
- column: SENSOR_ID
type: bigint
- column: TEMPERATURE
type: float
- column: MSG
type: varchar
precision: 50
- column: LOG_TIMESTAMP
type: timestamp
This file defines a single table, TEMPERATURE, in the SENSOR schema. Using the keywords `mimer-select/insert/update/delete` and `tee-select/insert/update/delete`, it is possible to control exactly which types of data access should be allowed from the normal world and secure world respectively. By setting the value of field `mimer-delete` to `0`, we specify that requests to the secure database from Mimer SQL to delete data shall be denied. Conversely, By setting the field `tee-delete` to `1`, we specify that the same request made via the Mimer Trust API shall be granted. This allows you to fine-tune the access policies for your tables. Access policy fields which are not given explicit values are defaulted to 0.
The secure tables support specifying one of the columns as the index column. This will cause the secure database to create and maintain an index for this column, which may greatly improve query performance for queries made through the Mimer Trust API. The index column is specified by name in the field `index-column`.
Most columns may be specified in only two fields, `column` and `type`. The `column` field contains the name of the column, and the data type is given in `type`. The value for `type` can be one of the following:
- INT
- BIGINT
- VARCHAR
- NVARCHAR
- FLOAT
- DOUBLE
- BOOL
- VARBINARY
- DATE
- TIME
- TIMESTAMP
- UUID
The type names match their corresponding type in Mimer SQL, with the exception of FLOAT which in Mimer Trust corresponds to a single precision floating point value, i.e. a Mimer SQL REAL.
Certain types also require a value for the field `precision`. These types are VARCHAR, NVARCHAR and VARBINARY. For VARCHAR and NVARCHAR, the value of `precision` defines the maximum amount of characters the column is able to hold. For VARBINARY, this value defines the maximum amount of bytes.
To use the table definition above to create tables, you can run the following command for Mimer Trust Admin:
mimertrustadm -u<ident> -p<password> -fsensor.yaml <dbname>
Similarly, to drop the tables in the definition file:
mimertrustadm -u<ident> -p<password> -fsensor.yaml -d <dbname>
If you’d like to create your mappings in a certain schema in Mimer SQL, you can specify it when creating your tables:
mimertrustadm -u<ident> -p<password> -fsensor.yaml --schema=MY_SCHEMA <dbname>
Your tables should now be created in the secure storage and are ready to be used from both the normal world and the secure world.
NOTE:
For the Linux on QEMU environment, the default value of `<dbname>` is `mimerdb`. On Android, the value is `mimerserver` and cannot be changed.
Via Your TA
To create a table from your TA you can use the Mimer Trust API as such:
// Defining the table
MimerTable table = {
.tblname = "SENSOR.TEMPERATURE",
.mimer_policy = MIMER_TABLE_FETCHONLY_POLICY,
.taapi_policy = MIMER_TABLE_REGULAR_POLICY,
.index_col = 0};

// Defining the columns
MimerColumn columns[] = {
{.colname = "SENSOR_ID", .type = MIMER_TYPE_BIGINT},
{.colname = "TEMPERATURE", .type = MIMER_TYPE_FLOAT},
{.colname = "MSG", .type = MIMER_TYPE_CHARACTER, .precision = 50},
{.colname = "LOG_TIMESTAMP", .type = MIMER_TYPE_TIMESTAMP},

MimerResult rc;
rc = Mimer_createTable(&table, columns, 4);
if(rc != MIMER_API_SUCCESS){
...
}
Here we created the table TEMPERATURE in schema SENSOR. It represents the same table as we created via the table definition file in the previous section.
Certain sets of access policies are readily available – such as `MIMER_TABLE_FETCHONLY_POLICY` – but it is also easy to create your own policy set by using the provided access policy macros. This table will have all access policies granted for calls made via the Mimer Trust API, but it can only be read – and not modified – from the normal world.
As mentioned in the previous section, it is possible to create an index on one of the table columns. In the Mimer Trust API, this column is specified by its position within the table, starting from 0. In the example, an index will therefore be created on the column `SENSOR_ID`. Tables can also be given the special value -1, meaning that no index will be created.
The table contains four columns of varying data types, where the string type needs a value for the `precision` field,
which specifies the maximum amount of characters to be stored in this column.
After the table is created, it is now ready to be used. If you want to make the table available from the normal world, remember to create the mappings for the table via Mimer Trust Admin:
mimertrustadm -u<ident> -p<password> -m --table=SENSOR.TEMPERATURE <dbname>
Inserting and Accessing Data
Once your tables are set up, it is time to populate them with some data. From the normal world, this is done in the same way as how you would insert and modify data in a normal Mimer SQL database. The Mimer Trust API uses a SQL-like syntax together with parameter sets and/or value literals.
From Mimer SQL
For interacting with Mimer SQL through the command line you can use the BSQL tool. This tool is included in the Mimer Trust download package for Linux on QEMU, as well as in normal Mimer SQL installations. If a graphical interface is preferred you can use DbVisualizer, which is also included in normal Mimer SQL installations. The Mimer Trust installation will make BSQL available directly in your QEMU environment, but it is also possible to setup a remote connection to the database from your host machine and use BSQL or DbVisualizer from there. For instructions on how to set up a remote connection, please see the documentation for your chosen platform.
Once connected to the database via BSQL, you can insert data like so:
INSERT INTO SENSOR.TEMPERATURE (sensor_id, temperature, msg, log_timestamp) VALUES (1, 23.4, 'NORMAL', BUILTIN.UTC_TIMESTAMP());
INSERT INTO SENSOR.TEMPERATURE (sensor_id, temperature, msg, log_timestamp) VALUES (1, 28.1, 'NORMAL', BUILTIN.UTC_TIMESTAMP());
INSERT INTO SENSOR.TEMPERATURE (sensor_id, temperature, msg, log_timestamp) VALUES (1, 32.9, 'OVERHEATED', BUILTIN.UTC_TIMESTAMP());
This data is now stored in the secure storage of the TEE. To read the inserted data, simply use normal SQL queries, e.g.:
SELECT SENSOR_ID, TEMPERATURE FROM SENSOR.TEMPERATURE WHERE MSG='OVERHEATED';

SENSOR_ID            TEMPERATURE
==================== ===============
                   1  3.29000015E+01

1 row found
To interact with Mimer SQL from normal world applications, the Mimer SQL C API can be used.
From Your TA
Accessing data from your own TA is easily achieved through the Mimer Trust API. Selected data is returned in result sets, which are iterated over and read by the provided API functions. For inserting data – or any query using specific values -, you can use parameter sets or write your literals directly in the SQL statement.
Inserting rows into a table:
// First row
MimerParamSet *p = Mimer_createParamSet();
Mimer_writeInt64(p, 1);
Mimer_writeFloat(p, 23.4);
Mimer_writeStringC(p, "NORMAL");
Mimer_writeTimestamp(p, "2023-10-20 15:51:23.456789");

MimerResult rc;
rc = Mimer_insert(0, "SENSOR.TEMPERATURE", p);
if (rc != MIMER_API_SUCCESS)
{
...
}

// Second row
rc = Mimer_insert(0, "INSERT INTO SENSOR.TEMPERATURE VALUES (2, 28.1, 'NORMAL', timestamp'2023-10-20 15:53:47.142352')", NULL);
if (rc != MIMER_API_SUCCESS)
{
...
}

// Third row
Mimer_clearParamSet(p);
Mimer_writeTimestamp(p, "2023-10-20 15:57:01.001430");
rc = Mimer_insert(0, "INSERT INTO SENSOR.TEMPERATURE VALUES (3, 32.9, 'OVERHEATED', ?)", p);
if (rc != MIMER_API_SUCCESS)
{
...
}
Reading the data:
MimerResultSet *data = NULL;
MimerParamSet *p = Mimer_createParamSet();
Mimer_writeStringC(p, "OVERHEATED");

rc = Mimer_select(0, "SELECT SENSOR_ID, TEMPERATURE FROM SENSOR.TEMPERATURE WHERE MSG=?", p, &data);
if (rc != MIMER_API_SUCCESS)
{
...
}

int64_t sensor_id;
double temp;
Mimer_readInt64(data, &sensor_id);
Mimer_readFloat(data, &temp);
When reading result sets, the internal result set cursor will automatically advance to the next column of the set. The Mimer Trust API provides several functions which allow you to iterate over the result set rows, skip columns, move to a specific place in the result set, or get information about the result set itself.