Introduction
As an example of connecting to a Mimer SQL database server using ODBC we will use the iODBC product, an ODBC Driver Manager. To verify the connection setup, we are going to use a demonstration program delivered with iODBC called odbctest.
In this article the macOS platform is used.
Description
Verify or install iODBC
iODBC is not a standard part of a macOS installation but a third-party package that has to be installed separately. The installation program can be downloaded from https://www.iodbc.org/ – look under “Downloads” for macOS.
Once installed the iODBC package will be present in the Applications folder as a subfolder iODBC with the administration program, as well as the library components which are all installed in the system library folder structure.
In order to test iODBC with Mimer SQL there has to be a database present on the system and in this example will we use a database named “mimerdb” so that has to be created before continuing with this example. Please note that it is not enough to have a database installed, it has to be installed after iODBC is installed to be added to the ODBC configuration.
(For details as to how to install Mimer SQL and how to create a database, please see the knowledge base article Installing Mimer SQL on macOS. In order to make a database available from iODBC, please make sure that the checkbox for ODBC is marked before creating the database.)
The ODBC Environment
In the iODBC folder under Applications there are several utilities, one of which is the ODBC Administrator. This program is available in two versions, one for 32-bit applications and one for 64 bits, and is used to create, edit and delete ODBC definitions. It also displays which ODBC drivers are installed on the system.
If a Mimer SQL Database Server was installed properly you should have a Driver definition for Mimer ODBC visible in the Drivers tab:

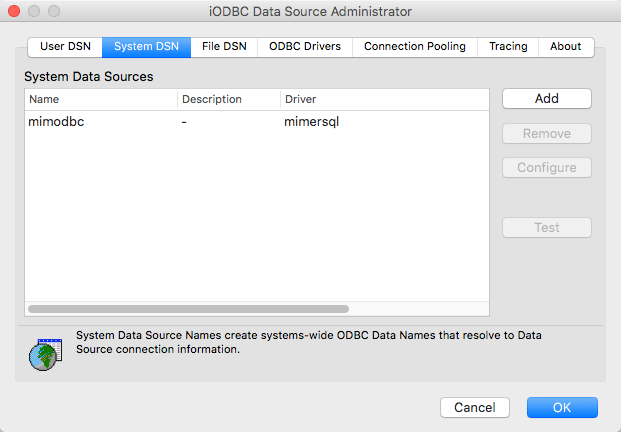
You should also have a data source defined. Click the System DSN button to see the list of available Data Source:
If you want to add a Mimer ODBC Data Source manually, click the Add button in the screen shown above. Select a Mimer ODBC driver in the Drivers list and press OK. You will now get a dialog where you should give a name and description for your data source. Do that and then press the Add button in the same window. Enter the Keyword “Database” by a double-click on “Key”, press the tab key and enter the name of your Mimer SQL database as Value. Please note that you must unlock the ODBC Administrator, by using the locker icon in left down corner, to be able to do any modifications.
Verify your ODBC setup
When Mimer SQL is installed properly and a Mimer SQL database server is installed and registered in the ODBC environment, open up a Terminal application window so that you get a system prompter. The Terminal application is found in /Applications/utilities. Start the odbctest program (or iodbctest and iodbctestw, for wide characters, in later versions), the iODBC Demonstration program, and use the database name for the database that you created earlier. In the following sample session, the mimserver database name and the SYSADM user (with the password chosen when the database was created) are used:
 # odbctest
 iODBC Demonstration program
 This program shows an interactive SQL processor

 Enter ODBC connect string (? shows list): ?

 DSN | Description
 ---------------------------------------------------------------
 mimdb | mimersql

 Enter ODBC connect string (? shows list): DSN=mimdb
 Data source name [mimserver]: mimdb
 Username []: sysadm
 Password []:
 Driver: 10.01.0004

 SQL> select cast(object_name as char(25)), object_type from system.objects
 where object_type = 'BASE TABLE'

                          |OBJECT_TYPE
 -------------------------+--------------------
 API_FUNCTION             |BASE TABLE
 AST_CODES                |BASE TABLE
 AST_SOURCES              |BASE TABLE
 CHAR_SETS                |BASE TABLE
 CHECK_CONSTRAINTS        |BASE TABLE
 COLLATE_DEFS             |BASE TABLE
 COLLATIONS               |BASE TABLE
 COLUMNS                  |BASE TABLE
 COLUMN_OBJECT_USE        |BASE TABLE
 COLUMN_PRIVILEGES        |BASE TABLE
 DATABANKS                |BASE TABLE
 DOMAINS                  |BASE TABLE
 DOMAIN_CONSTRAINTS       |BASE TABLE
 EXEC_STATEMENTS          |BASE TABLE
 FIPS_FEATURES            |BASE TABLE
 FIPS_SIZING              |BASE TABLE
 KEY_COLUMN_USAGE         |BASE TABLE
 LEVEL2_RESTRICT          |BASE TABLE
 LEVEL2_VIEWCOL           |BASE TABLE
 LEVEL2_VIEWRES           |BASE TABLE
 MANYROWS                 |BASE TABLE
 MESSAGE                  |BASE TABLE
 MODULES                  |BASE TABLE
 OBJECTS                  |BASE TABLE
 OBJECT_COLUMN_USE        |BASE TABLE
 OBJECT_OBJECT_USE        |BASE TABLE
 ONEROW                   |BASE TABLE
 PARAMETERS               |BASE TABLE
 REFER_CONSTRAINTS        |BASE TABLE
 ROUTINES                 |BASE TABLE
 SCHEMATA                 |BASE TABLE
 SEQUENCES                |BASE TABLE
 SERVER_INFO              |BASE TABLE
 SEVERITY                 |BASE TABLE
 SOURCE_DEFINITION        |BASE TABLE
 SPECIFIC_NAMES           |BASE TABLE
 SQL_CONFORMANCE          |BASE TABLE
 SQL_LANGUAGES            |BASE TABLE
 STATEMENT_DESCRIPTORS    |BASE TABLE
 STATEMENT_ROUTINE_USE    |BASE TABLE
 SYNONYMS                 |BASE TABLE
 TABLES                   |BASE TABLE
 TABLE_CONSTRAINTS        |BASE TABLE
 TABLE_PRIVILEGES         |BASE TABLE
 TABLE_TYPES              |BASE TABLE
 TRANSLATIONS             |BASE TABLE
 TRIGGERED_COLUMNS        |BASE TABLE
 TRIGGERS                 |BASE TABLE
 TYPE_INFO                |BASE TABLE
 USAGE_PRIVILEGES         |BASE TABLE
 USERS                    |BASE TABLE
 USER_DEF_TYPES           |BASE TABLE
 VIEWS                    |BASE TABLE

 result set 1 returned 53 rows.

 SQL> quit

 Have a nice day.
 #
Note! The error message “Dialog failed” will be received if the ODBC connect string is not given in the format “DSN=mimdb”.
The Mimer ODBC Driver and the DSN is automatically installed in system wide locations, i.e /Library/ODBC. In some situations it may be necessary to define the ODBCINI environment variable to get access to these definitions:
# export ODBCINI=/Library/ODBC/odbc.ini