Introduction
This article will describe the simple procedure of getting started with Mimer SQL on macOS.
Description
Installation of the Mimer SQL software
The installation starts by downloading the Mimer SQL product for macOS from the Mimer SQL Download page.
When this installation program is launched the following screen is displayed:
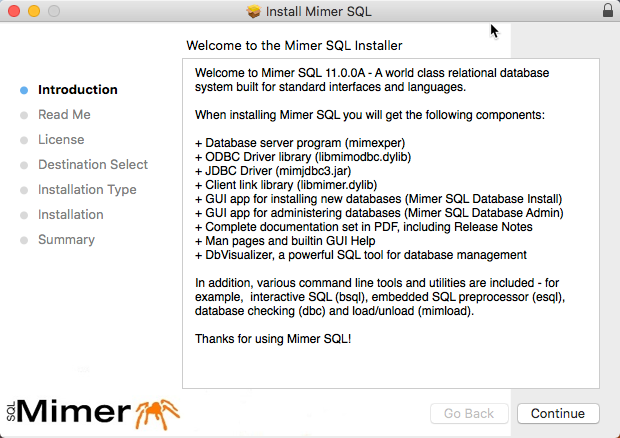
As you can see to the left consists the installation of a series of steps that has to be completed. Mainly, you take part of the information that will be provided on the screen and carries on to the next step by clicking the Continue button. If suitable, when selecting destination, use the default value /Applications for the folder to install into.
NB: If you re-install the same version of Mimer SQL as installed earlier it will overwrite the current one. If you install a newer version, i.e. with a higher version, they will be installed in parallel, and the most recent installation will be the one used by default. To continue using the old version the PATH and DYLD_LIBRARY_PATH environment variables must be set to point out the installation in question. See the man pages for the mimlink, mimunlink and mimuninstall commands for information on how to deal with parallel installations.
Create a Mimer SQL database
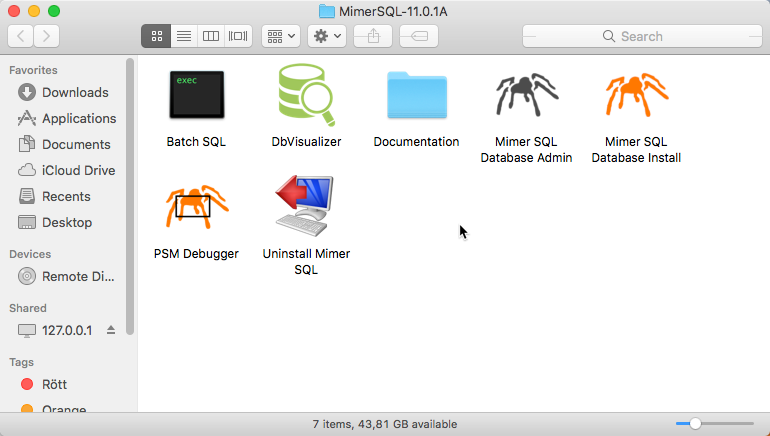
When the software is installed you will find the Mimer SQL installation folder as /Application/MimerSQL-11.0.1A, or similar depending on the version number. In this directory you will find, amongst other things, three applications, Mimer SQL Database Install, Mimer SQL Database Admin and DbVisualizer.
To create a Mimer SQL database, launch the Mimer SQL Database Install application.
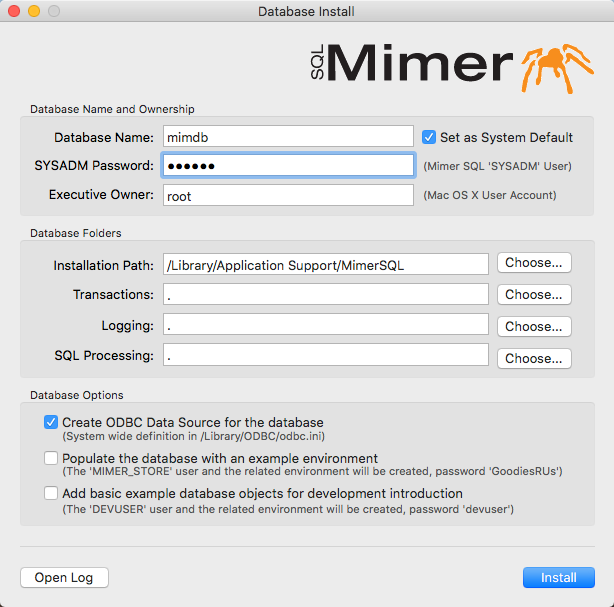
You should choose a database name and a password for the SYSADM user – these fields are required. The SYSADM user is the System Administrator for the database you are going to create, i.e. the user that can do administrative tasks, create other users and delegate access rights and privileges. This means that this password is important – it should be kept secret and it should be remembered!
In the screenshot above, the database name “mimdb” has been chosen and a password has been entered in the password field. The rest of the fields and options have the default values. In this state you are ready to click the Create button to continue with the installation.
NB: If the computer has several disks, and if you are creating a production system, it is advisable to spread the databanks on those disks. The LOGDB databank file should be given highest priority to get a separate disk. This is due to database recovery reasons in case of a disk failure. If there are three disks or more available, the TRANSDB databank file should be placed on the fastest disk for performance reasons. For details, see the Mimer SQL Documentation set for details on databanks and their placement. Look for The Database Environment section in the System Management Handbook part.
When the database is created, the database server is started for the database automatically, which means that the database is opened for multi-user access.
When the database is created successfully another application in the installation folder, Mimer SQL Database Admin, can be launched. This application can be used to administer the database servers that you have.
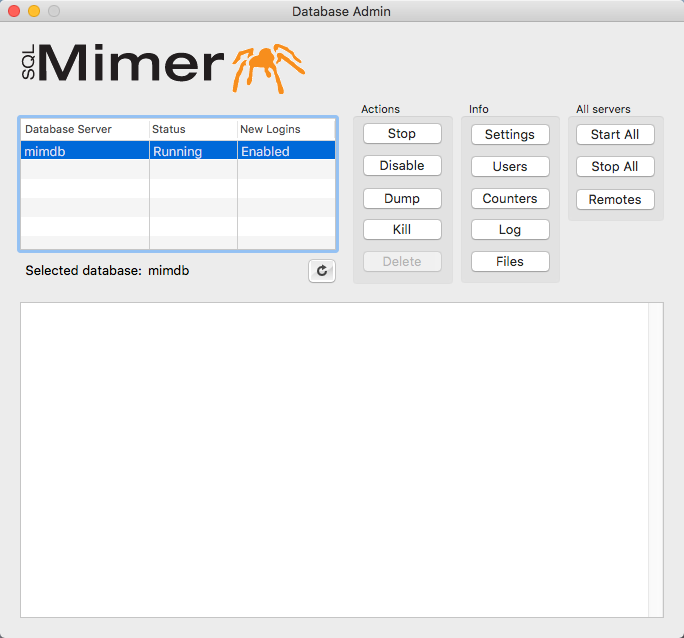
In this session the state for the database server named mimdb has been asked for.
Connecting to the database
One of the easiest ways to get a connection to the created database is to open up a Terminal application window and launch the Mimer BSQL program. The Terminal application is found in /Applications/utilities. Launch it from the Finder application.
At the command line prompter, write bsql followed by the database name for the database that you just created, and login using the SYSADM user and the corresponding password.
 # bsql mimdb
 .
 .
 .
 SQL>select cast(object_name as char(25)), object_type from system.objects
 SQL&where object_type='USER DEFINED TYPE';
                           OBJECT_TYPE
 ========================= ====================
 GIS_COORDINATE            USER DEFINED TYPE
 GIS_LATITUDE              USER DEFINED TYPE
 GIS_LOCATION              USER DEFINED TYPE
 GIS_LONGITUDE             USER DEFINED TYPE

                  4 rows found
 SQL>exit;
 #
Links
A more sophisticated access to the database can be achieved by using the DbVisualizer application. See the article Mimer SQL and DbVisualizer using JDBC on macOS on how to use this powerful database tool.
To connect to the database using ODBC, please see the articles Using Mimer SQL with iODBC on macOS and Using Mimer SQL with Core Data on macOS.
To be able to connect to remote database servers, you need to add an entry for each remote database in the /etc/sqlhosts database registration file. See the man page for the mimhosts command for details on how to do this.
Note! You may have to consider the article Mimer SQL and the macOS built-in firewall when your database server is going to be accessed by remote database clients.
Enjoy!