Introduction
This article will describe how to use Mimer SQL with the macOS Core Data Framework, and the third party product named Odbc Framework. The macOS Cocoa development environment will be used.
Using the Core Data framework for application development is very powerful. By doing some ‘drag-and-drop’ and programming a few helper classes, the rest is easily finished up with the CoreData Model Editor and Interface Builder tools. This article will describe the background information and how to get a prepared example running, and then also describe how the application is developed from scratch.
Cocoa is the native object-oriented programming interface recommended for Mac OS. It consists of libraries and APIs that form the development layer in the macOS environment. Cocoa uses the Model-View-Controller (MVC) design, where Model classes represent the raw data, Views are the visual representations of the data in the model, and Controller classes contain the logic that links the models to their views. In addition, Cocoa applications will automatically inherit the great and unmistakable macOS look and feel. Using Cocoa with the Xcode IDE, including the Interface Builder and the Objective-C language, is the recommended way to create Mac OS applications.
Core Data provides a flexible and powerful data model framework for Cocoa applications based on the MVC pattern. Core Data organizes the application model layer into a set of in-memory defined data objects, and provides an infrastructure to deal with common functionality such as insert, select, update and delete.
The Odbc Framework is a Cocoa framework providing access to ODBC data sources. It works on top of the iODBC Framework which is a widely portable C-oriented framework that follows the ODBC specification (Open Database Connectivity). The Odbc Framework includes a Cocoa Core Data Persistent Store for Odbc, which will be used here.
To get the best out of this article, some knowledge of relational databases, Xcode and Objective-C is presumed.
Software Requirements
The example in the article is verified on macOS version 10.9 and Xcode version 5.0.2. The Xcode IDE shall support ARC (Automatic Reference Counting). Both these packages are downloaded for free from the Apple AppStore.
Mimer SQL for macOS version 10 is downloaded from the Mimer SQL Download page, and it is free of charge for evaluation.
The iODBC framework 3.52 or later is needed. iODBC is a platform independent Open Source implementation of the ODBC and X/Open specifications. If it is not already installed, download the package from www.iodbc.org and install it. Among other things, it will install the iODBC Administrator application, which is a well-suited GUI for ODBC data source administration.
The Odbc Framework that was introduced above, is needed. The repository should be cloned, so a repository manager needs to be installed. For example, use the free products SourceTree or GitHub for Mac. Then clone the osx-cocoa-odbc repository from github.com/mhakman/osx-cocoa-odbc. This framework is used with the GPL license.
An Example Application
Example Description
An example application is found within the Odbc Framework package. The example theme is a price catalog for books, with related authors. It is built up using four display tables and some buttons for administering the register. One or several book titles can be associated with one or several authors.
The application user interface follows the Apple Human Interface Guidelines.
Example Data Model
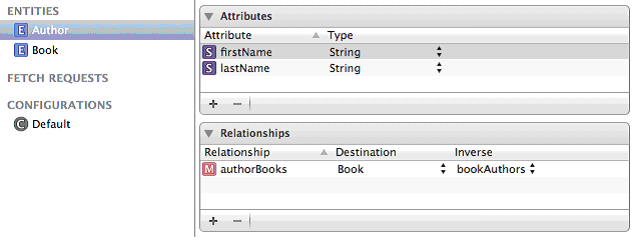
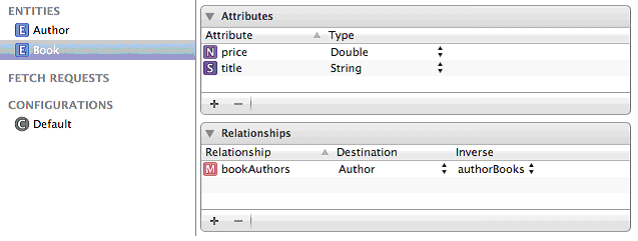
The example uses the following Core Data relationship model:

The model consists of two entities and two relationships. The entity Book has the attributes ‘price’ and ‘title’. The entity Author has the attributes ‘firstName’ and ‘lastName’. The double-headed arrow between these entities represents the two relationships. There is one relationship in each direction, i.e. the one named ‘bookAuthors’ from the entity Book to the entity Author, and the one named ‘authorBooks’ from entity Author to the entity Book. Both are one-to-many relationships, meaning that each book may have been written by a number of authors and each author may have written any number of books.
The Core Data relationship model above was generated by the Xcode Core Data model editor, based on the following input information:
When the example application is run for the first time, the following schema is generated in the ODBC data source (database):
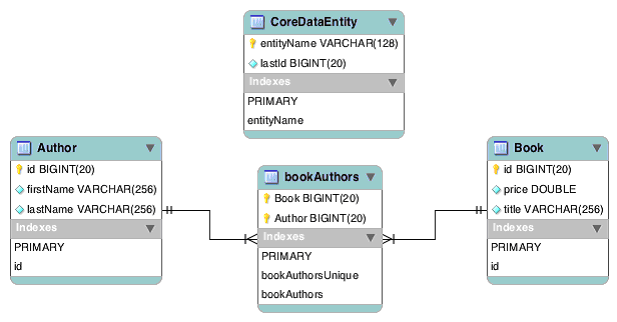
The schema above contains four tables, in three levels:
- The first table is ‘CoreDataEntity’, which is needed in every ODBC Core Data application. It keeps track of primary keys used in the other tables.
- Next there are two tables, one for each Core Data entity, in this case ‘Author’ and ‘Book’. For each entity a table is generated containing the column ‘id’ as the primary key, followed by the entity attributes.
- Finally, one table is left to explain. Usually, each entity relationship results in one table. The only exception is if there is an inverse correlation between two relationships, which is the case in this example. Thus, the table ‘bookAuthors’ with columns ‘Book’ and ‘Author’ is used to handle both relationships in the example. This table also has foreign key constraints to the ‘Author’ and ‘Book’ tables.
Software needed for the Example
The iODBC package is presumed to be installed. For system wide access, the iODBC.framework should be found in /System/Library/Frameworks. If not, the article named Using Mimer SQL with iODBC on Mac OS can be used as a guide to the installation.
Then the Mimer SQL DBMS must be installed, and a database should be created. When creating the database, the corresponding ODBC Data Source definition will be created automatically by default. Follow the article Installing Mimer SQL on macOS for this purpose. To get a database user, an Ident, to utilize in the test session, check the box for ‘Add basic example database objects for development introduction’. This will create the database user DEVUSER with password ‘devuser’ in the database.
As mentioned, the example program discussed above is included in the Odbc Framework. This framework is found in the osx-cocoa-odbc repository, which should be cloned to your environment now using any Git Client, see the Software Requirements section. It is presumed that the Odbc.framework directory is in place.
Building the Example
The osx-cocoa-odbc repository contains an Xcode project with six targets:
- Odbc – builds the framework itself
- TestConnect – tests connection to an ODBC data source
- LoginServer – builds the LoginServer
- OdbcExample – builds Cocoa Core Data application using ODBC
- OdbcDocumentation – generates the documentation
- OdbcTests – performs unit tests of the framework
Locate the repository main directory using Finder and then double-click on the ODBC.xcodeproj file. This will open the project in the Xcode IDE with the following entry screen:
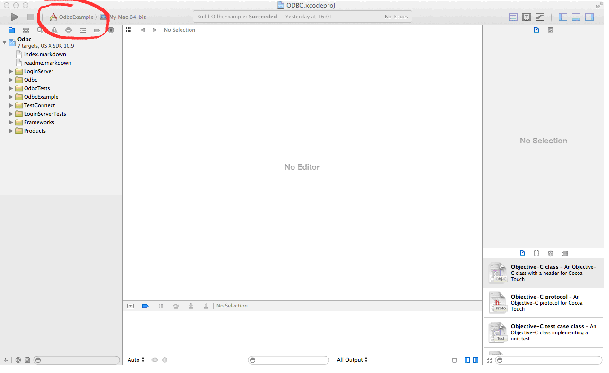
Among the targets available, the current one is chosen by clicking on the target showed in the upper left corner (see the painted circle), whereupon a target list appears and the selection can be made. Select and build targets 1 to 4, according to the list above.
By default, Xcode first builds and then, if the target is a main program, runs the target. TestConnect is the first application reached. Here, the connection to the database that was created when installing Mimer SQL can be verified. The DSN has the same name as the database that was created, and if the instruction above was followed, the username DEVUSER (case insensitive) with password ‘devuser’ can be used. Values are entered in the “All Output” pane down to the right.
Next target to build is the LoginServer. When executed, again, the connection to the database server can be verified – this time through the application login dialog:
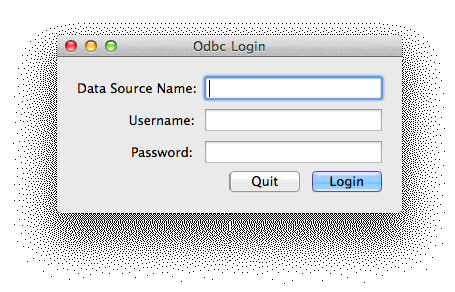
Finally, build the OdbcExample that we have introduced above. When executed, follow the instructions below.
Execute and Navigate the Example
When the “Odbc Example” application is started, it shows the login window where the ODBC Data Source Name (DSN), database username, and password should be entered. When logged in, the example application displays the following user interface. At the first run the tables are empty. Data items, as the sample data shown in the picture, are added manually using the ‘+’ button (see detailed description below):
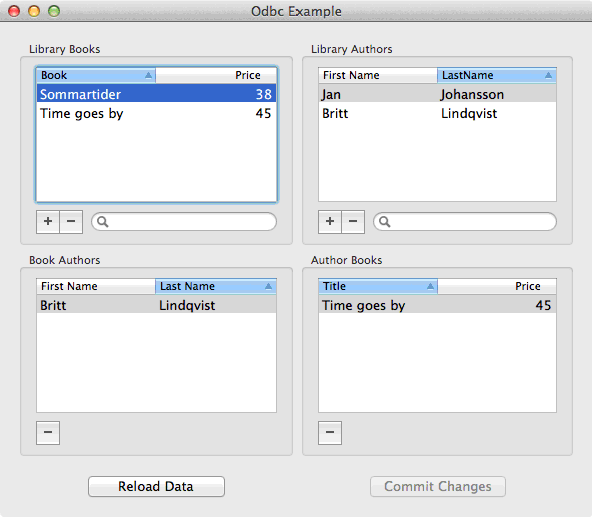
The tables are related to each other in a vertical manner. Look at the two tables to the left. The selected book in the Library Books table (“Sommartider”) is written by the author displayed in the Book Authors table (“Britt Lindqvist”).
By selecting a book in the ‘Library Books’ display table, the authors to that book are shown in the ‘Book Authors’ table right beneath. In the same manner, by selecting an author in the ‘Library Authors’ display table, the books written by this author are displayed in the ‘Author Books’ table beneath.
Administering Books/Authors in the Example
The ‘Library Books’ table holds books added to the library, and the ‘Library Authors’ table displays the authors added to the library. Books and authors are added/removed by using the corresponding +/- buttons under the tables, respectively. If ‘+’ button is clicked a new line will be added in the table where the new data can be entered. If an item is selected and the ‘-‘ button is used, the item is removed. Use the ‘Commit Changes’ button to save the changes in the database.
To attach an author to a book, the book is first selected in the ‘Library Books’ window. Then the author name is dragged from ‘Library Authors’ cross the screen to the ‘Book Authors’ table, right below ‘Library Books’. If there are several authors, the procedure is repeated for additional authors. Again, to save the data use the ‘Commit Changes’ button. The catalog information for this book is now complete.
It is also possible to do the operation the other way round. Select an author in ‘Library Authors’. Then drag a book from ‘Library Books’ to the ‘Author Books’ display table.
Relations between books and authors are removed by using the ‘-‘ button under the bottommost tables. For the item selected in an upper table, the related item selected in the table beneath will be removed.
Reload and Commit buttons
If not programming for it, data changes are saved to the database when the application is closed. In order to achieve a more flexible way to store data to, and retrieve data from, the database, the Reload Data and Commit Changes buttons are added.
Creating the example application from scratch
This section will provide a guide for creating a new Xcode project using a Persistent Store for ODBC. It will show the basics in creating the application described above.
The part of the application that will be developed below is the Author table and related buttons with functionality to list, add and remove data. For other implementation details, please look into the Xcode project itself.
Creating a new project
Start the Xcode IDE and create a new Xcode project of type ‘OS X’ -> ‘Application’ -> ‘Cocoa Application’, using the ‘File’ menu. Select a name for the project, in this example the name ‘TestOdbcStoreX’ is used. Verify that the ‘Use Core Data’ checkbox is not checked. (If selected, a lot of code will be generated to the AppDelegate, code that is already contained in the Odbc.framework). Continue the dialog until the new project is created.
Build and run your new application. It should build without errors and warnings. Quit the application.
Adding required frameworks
Copy the cloned Odbc.framework from osx-cocoa-odbc project directory to /System/Library/Frameworks (or to your project directory). Copying the framework to /System/Library/Frameworks makes the framework available for other projects as well, and it fits with all pre-settings. To copy using Finder, control click on the Odbc.framework located in the ‘osx-cocoa-odbc’ directory, and select ‘Copy “Odbc.framework”‘ in the popup menu. Then go to /System/Library and control click on Frameworks and select ‘Paste Item’ in the popup menu.
Back to XCode. Right or Control click the ‘Frameworks’ item in the project, found in the left pane of the Project Navigator as shown in the Xcode entry screen shown earlier in this article. Then add the Odbc.framework using the “Add Files to…” entry in the popup menu. When adding, verify that the ‘Copy items to destination…’ checkbox is not checked. The files to be added are located in /System/Library/Frameworks, or in the project directory, depending on where they were copied. Warning! Do not double click when navigating among the files here – that will immediately start the add operation!
Then do the same thing with the CoreData.framework located in /System/Library/Frameworks.
If the Odbc.framework were copied to project directory, instead of to /System/Library/frameworks, then the project settings needs to be updated. Double-click on the project name to the left to open the Project Editor, and select the ‘Build Settings’ tab. Locate the ‘Runpath Search Paths’ setting and double-click the value field for an input box to be displayed. Enter “$(PROJECT_DIR)” using the ‘+’ button in the input box.
Close this navigator window and return to the main project navigator entry screen. Build and run the application and then, quit the application.
Also, make sure the iODBC.framework is available and accessible, for example in /System/Library/Frameworks.
Modifying the generated AppDelegate
Modify the AppDelegate.h. Add the following line to the imports directives:
#import <Odbc/Odbc.h>
Modify the @interface statement to read as follows:
@interface AppDelegate : OdbcAppDelegate
The AppDelegate.h should now look like the following:
#import <Cocoa/Cocoa.h>
#import <Odbc/Odbc.h>

@interface AppDelegate : OdbcAppDelegate
@property (assign) IBOutlet NSWindow * window;
@end
Modify the AppDelegate.m. Change the ‘applicationDidFinishLaunching’ method as follows:
 - (void) applicationDidFinishLaunching : (NSNotification *) aNotification {
    [super applicationDidFinishLaunching : aNotification];
 }
Also add the following method:
 - (NSURL *) persistentStoreUrl {
    return self.loginUrl;
 }
The method ‘loginUrl’ displays a login dialog box. It lets the user specify a data source name, username, and password. Then it verifies the information by trying to connect to, and disconnect from, the database. If this operation is successful it returns the required URL.
The AppDelegate.m should now look like the following:
 #import "AppDelegate.h"
 @implementation AppDelegate

 - (void) applicationDidFinishLaunching:(NSNotification *) notification {
    [super applicationDidFinishLaunching : (NSNotification *) notification];
 }

 - (NSURL *) persistentStoreUrl {
    return self.loginUrl;
 }
 @end
Again, build and run the application to verify that there are no problems. Quit the application. Please note that the login dialog box will not be shown yet.
The above is all the Objective-C code needed to be written. The rest of the work will be done using the Xcode Model Editor and the Xcode Interface Builder.
Creating the Data Model
In this section the data model for the application will be created.
Right or control click on the main target, i.e. the application name in the list to the left in the Xcode Project Navigator. Select ‘New File…’ in the popup menu, and then select ‘OS X’ -> ‘Core Data’ -> ‘Data Model’ in the dialog. Click the ‘Next’ button, and continue the dialog. It is recommended to specify the same name as the application name as ‘Model’.
Again, build and run the application to verify that there are no problems. Quit the application.
Now the set up is done and the remaining development to get the application completed will be the same as for any other Core Data application.
Entity and Attribute Management
In the Project Navigator, locate the model file created above – extension is ‘.xcdatamodeld’, then double click the model to open the Model Editor. Click the ‘Add Entity’ button, and specify the entity name ‘Author’ in the Data Model Inspector – double click on ‘Entity’ in the Entities list to the left to update the name.
Next is to add attributes. Use the ‘+’ button in the Attributes pane. First add the attribute ‘firstName’ of type ‘String’, then add the attribute ‘lastName’ of type ‘String’.
Now we have a simple data model with entity ‘Author’ having two attributes, ‘firstName’ and ‘lastName’. In the Model Editor this looks like the following:
Again, build and run the application to verify that there are no problems. Quit the application.
Adding Object Management
It is time to add an Array Controller. The array controller is a class that manages a collection of objects. In this simple case it will control a table with two columns and two buttons.
The work will be continued in the Xcode Interface Builder. The following picture will be used when describing how to get there:
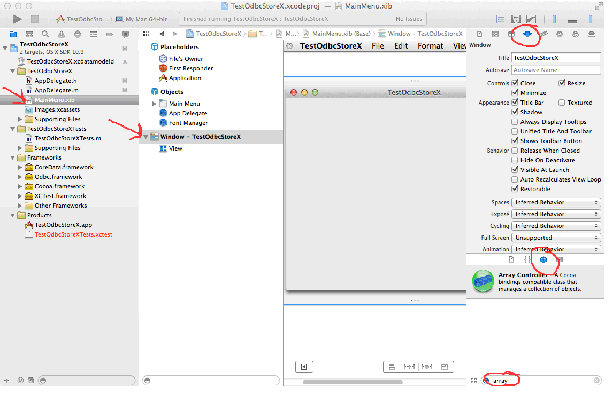
Locate and click on the ‘MainMenu.xib’ file in the Project Navigator to open the Interface Builder user interface (UI), see the leftmost painted arrow in the picture. Then click on the Window section, as pointed out by the other painted arrow. This will open the application UI screen, and also the related tools pane to the right. Select the Attributes Inspector, pointed out by the uppermost painted circle in the picture. Then select the Object Library as shown by the second painted circle, and write ‘array’ in the search field located in the bottom right corner of the picture. The Array Controller object will now be shown in the list, as in the picture above. Drag this Array Controller object to the Objects section in the second leftmost pane in the screen.
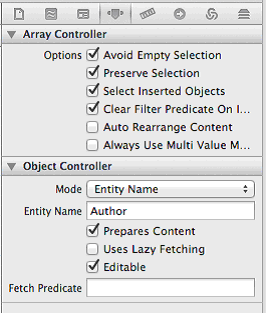
Select the new ‘Array Controller’ object. In the Inspector pane select ‘Attributes Inspector’ (it may already be shown), specify ‘Entity Name’ from the list box in the ‘Mode’ field and specify ‘Author’ in the ‘Entity Name’ field. Check the ‘Prepares Content’ checkbox. Now the Attributes Inspector should look as following:
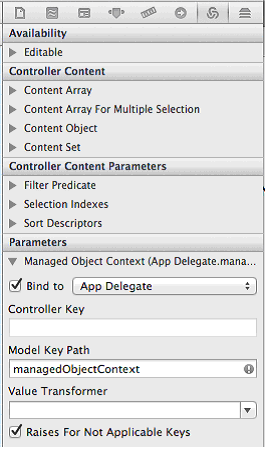
Move the cursor over the icons in the top line of the pane to get a help text that leads to the Bindings Inspector. Find the ‘Parameters’ heading, and expand the ‘Managed Object Context’ item. Check the ‘Bind to’ checkbox and choose ‘App Delegate’ in the drop down box. Specify ‘managedObjectContext’ in ‘Model Key Path’ field.
The Bindings Inspector should now look as follows:
Again, build and run the application to verify that there are no problems. This time the application should display a login dialog. Fill in the required access information and press ‘Login’ button. If the information was correct then an empty application window is shown. Otherwise an error dialog is shown. Quit the application.
Adding the Application Display Table
Again, locate and click the ‘MainMenu.xib’ file in the Project Navigator to open the Interface Builder UI. Then click on the Window section to open the application UI screen, and also the related tools pane to the right. Write ‘table’ in the bottom right search field and then drag the ‘Table View’ object item to the application UI screen. Adjust the table position and size. Blue popup lines are guidelines to centralize and to get the recommended borders according to the Apple Human Interface Programming Guidelines.
Click on the table a few times, until an option to adjust the table columns widths opens, and do the adjustment.
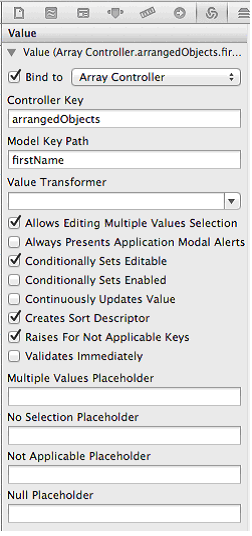
Select the first column in the added table – click until the Table Column view appears in the Attribute Inspector. Set Title to ‘First Name’ and press Enter. In the Bindings Inspector, open the Value section. Check the ‘Bind to’ check box, and select the ‘Array Controller’ in the related drop down list. The Controller Key option should be ‘arrangedObjects’ and Model Key Path set to ‘firstName’. Press Enter.
The resulting Bindings Inspector view for the First Name column bindings should look as follows:
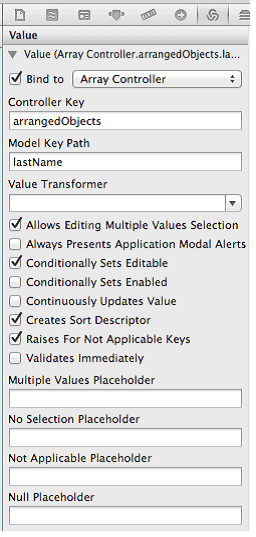
The operation should be repeated for the second column. Select the second column in the table – click until the Table Column view appears in the Attribute Inspector. Set Title to ‘Last Name’ and press Enter. In the Bindings Inspector, open the Value section. Check the ‘Bind to’ check box, and select the ‘Array Controller’ in the related drop down list. The Controller Key option should be ‘arrangedObjects’ and Model Key Path set to ‘lastName’. Press Enter.
The resulting Bindings Inspector view for the Last Name column bindings should look as follows:
Again, build and run the application to verify that there are no problems. Now, after passing the login dialog, the added table with the two columns named ‘First name’ and ‘Last Name’ should be shown. Quit the application.
Adding Buttons
Time to add a Square Button to the view. Search for ‘square’ in the right bottom search field, and drag the Square Button object into the application UI screen. In the Attributes Inspector, find the ‘Image’ drop down list and select ‘NSAddTemplate’.
Now it is time to connect the button to the array controller. Select the button in the UI, control-click (or use right mouse button) on it and hold. Keep holding and drag to the ‘Array Controller’ object in the Object section of the list to the left. A blue line will show up, indicating that a relation will be established. Drop when the Array Controller list item is highlighted and select ‘add:’ in the popup menu.
Add another Square Button to the view. In the Attributes Inspector, find the ‘Image’ drop down list and select ‘NSRemoveTemplate’. In the same way as described for the first button, control-click (or use right mouse button) on the button in the view and drag to the ‘Array Controller’ object. The blue line between the objects, indicating the relation establishment, should be there. Drop when the Array Controller item is highlighted and select ‘remove:’ in the popup menu.
Control-click (or right-click) on the Array Controller object it the Object section, which should obtain the following popup:
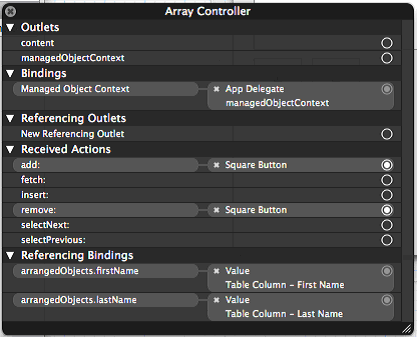
Verify that the bindings and actions are as expected.
Build and run the application. When executed, it should display a window like following. At the first run the table is empty. Data items, as the sample data shown in the picture, are added manually using the ‘+’ button:’¨
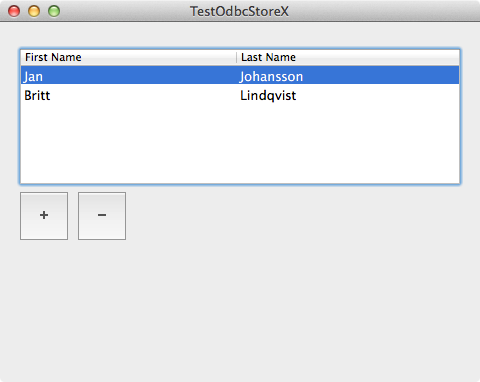
This basic application is now completed!
Authors are added using the ‘+’ button, and they are removed using the ‘-‘ button. An author can be modified by double-clicking on it. The changes will automatically be saved to the database when quitting the application.
Summary
This article describes in detail how to create a simple application in the macOS Cocoa development environment using Xcode. The application involves data management using a Mimer SQL database in the bottom and the Core Data framework in between. To connect Core Data with Mimer SQL, the third party Odbc Framework is used.
Links
A starting point to learn more of Mimer SQL can be to read the Mimer SQL Technical Description. All Mimer SQL Documentation can be found at the Mimer SQL Documentation Site.
The Odbc Framework is located at osx-cocoa-odbc. For more detailed information on the framework, the application and the related Xcode project, please see the Odbc Framework Users Guide found in the osx-cocoa-odbc repository.
For more information on iODBC, please refer to www.iodbc.org »
For details from Apple regarding the Cocoa Frameworks, see the Apple Developer site, or search globally for “Apple Cocoa” and “Apple Core Data“.